
Written by Melody Davis, CMG 2024
I am a gardener. I love the summer months when my garden delivers squash, broccoli, green beans, tomatoes and lettuce, and all sorts of other vegetables. But even at that, I must admit that when time is short, unless they can be eaten raw, I don’t head to the garden for vegetables that have to be harvested, cleaned, prepared, and possibly cooked, I’m looking for something super quick and easy. If I don’t find something packed with nutrition in easy reach, I usually end up eating something far less healthy than what I would like. In the winter when nothing is growing in the garden, growing both sprouts and microgreens keeps fresh, nutritionally dense produce available to add to any meal. Whether they are stored in the refrigerator or if the microgreens are still in the growing trays, just a few snips will get me all I need for a nutritionally packed meal or snack.
Sprouts and microgreens, while similar, are quite different in the equipment required, attention needed, and time to harvest, so we will look at both individually. Just a note, larger volumes of seed are needed for growing sprouts and microgreens; the little packets from the store simply will not do. There are many companies that sell large quantities of seed for this purpose. Look for organic, clean seeds from a reliable source. You will find a vast variety of seeds available, so there is a lot of room for experimenting.
 Sprouts are a good option if you want a quick harvest or if you don’t have a window or light setup for growing plants. I bought a simple 2-quart sprouting jar several years ago that serves me well. A simple internet search using “sprouting jars” will show you entire setups including tilting stations (which I will explain). I do not have lots of storage in my kitchen, so I like as little equipment as possible. If, like me, you want to keep it simple, search for “sprouting lids” that easily attach to your mason jars and serve you nicely with little storage impact.
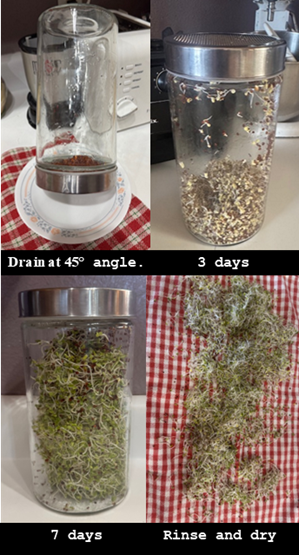
To get started, I put a couple of tablespoons of seed in my jar, cover them with water and swish and drain. I do this a couple of times just to clean the seeds themselves. Next, I fill the jar about half full of water and soak the seeds for 8-12 hours. After they soak, I drain the water and rinse the seeds a couple of times. After I have drained the water again, I turn the jar upside down, resting one edge of the lid in a saucer and leaning the jar against something so it is at about a 45-degree angle to drain excess water. If it is not in your way to leave it at a tilt like this, you can cover it with a towel, but if you have limited space, set a timer and leave it for about 30 minutes. After 30 minutes, put the jar upright in a dark cabinet or cover it with a towel and leave it on the counter. I leave it on the counter, so I don’t forget about it! If you purchase a kit with a tilting stand, you can leave it upside down between rinsings. Rinse the seeds twice daily. Every time you rinse, rinse, and drain a couple of times then let it drain at a 45-degree angle again. My sprouts germinate in about three days. When the sprouts start to have a flush of green, I continue rinsing, but I remove the towel to allow those tiny sprouts to green up for about a day which increases their nutritional content. When you are ready to harvest, give them a good final rinse or two, drain them, and then lay them out on a kitchen towel to dry. When I store them in the fridge, I always place a folded paper towel in the bottom of the container to absorb any excess moisture. If I don’t use the sprouts and they begin to look a little peaked, I just slip them in a zip bag, squeeze out the air and put them in the freezer. Frozen, they can still be used in smoothies or slipped into stir fry or anything else you might be cooking. Sprouting can be done anywhere which makes it something anyone can do, even kids, if you simply maintain these two steps: rinse and drain.
 Microgreens are something I started growing this past year after visiting a friend who began growing microgreens to overcome health challenges she was facing. Since I already had a growing rack with lights and trays, I realized all I needed was seeds and soil. If you do not have grow lights, but you have an area in your home with good sunlight coming in a window, you could also be ready for growing microgreens.
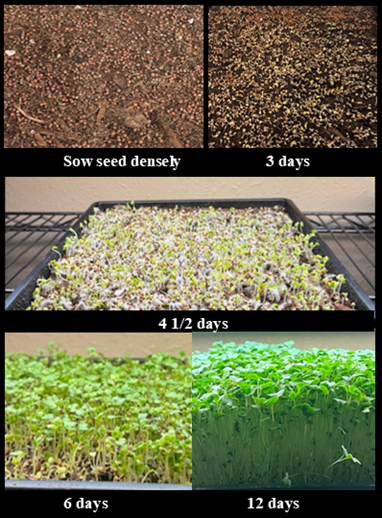
Starting microgreens is easy. You need a tray with drainage holes in the bottom that fits into a tray without drainage holes. In a standard 10×20 set up, you can use a single 10×20” tray or two 10”x10” trays or eight 5”x5” trays or any combination thereof to grow a variety of greens. Microgreens can also be grown hydroponically, but I will only be addressing those grown in soil in this article. Simply put 0.5-1 inch of potting soil of your choice into the tray with holes, press the soil evenly into the tray, then sprinkle a generous layer of seeds on top of the soil. For small seeds, I like to use an empty spice jar for even sprinkling. I then take the tray with no holes, set it on top of the seeds and press on it to push the seeds slightly into the soil, then I dust off the solid tray and place it under my seeded tray. Now, using a simple spray bottle, spray the seeds and soil with water until it looks good and wet and then cover the tray with anything that blocks light; I use the lid to a plastic tub. Check the seeds daily, spray lightly or if any soil looks dry, spray that area well and make sure you get the sides of the tray. Keep doing this until you see germination across most of the tray, this is usually about three days.
Once you have good germination, remove the cover, place the tray under grow lights or near a window, and begin watering from below. I usually start by pouring about 16 oz of water into the bottom tray. As the plants grow, I sometimes need to increase that by 8 oz or so. Water daily. If there is standing water in the tray when I water, I water a little less. If the plants look healthy and the bottom tray just has a little moisture, I have hit the sweet spot for watering. At this point, there is nothing to do but water and wait. The greens are usually ready for harvest around 12-14 days. I have tried waiting for about three weeks to harvest the greens, but there is little additional growth, so I usually harvest around two weeks.
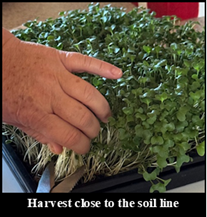 When you are ready to harvest, just clip the greens as close to the soil line as you can without touching the soil. It is better to lose a little stem than to try to cut too close and have potting soil to deal with. If you do pull up any potting soil, clip that area off; if it gets on the greens, make sure to wash the greens. Otherwise, just lay the harvested greens on a towel to dry a bit before storing them in a bag or container with a paper towel. The remaining soil and stems can head to the compost. As with sprouts, if the microgreens start to look a little spent, put them in a zip bag and toss them in the freezer.
The most frequent problem I have heard from those who grow either sprouts or microgreens is that mold can sometimes ruin a crop. For sprouts, you must rinse well twice a day; that is sufficient in our dry climate. With microgreens, make sure you are not overwatering. You want enough water so your greens are healthy and vibrant, but you do not want them sitting in wet soil; that bottom tray should be almost dry when you water each day. The only time I encountered mold was when I was experimenting to see if my greens would regrow from the roots after I harvested them: they did not and I ended up with a moldy mess. Whether you encounter any mold or not, each time you start a new batch of greens, wash both trays very well with dish soap. Another word of caution is that if you are going out of town, do not start any sprouts or greens before you leave, they need daily attention. I have been happily surprised to find that growing both sprouts and microgreens has been almost completely problem-free for me.
Sprouts and microgreens are quite easy to incorporate into your daily meals. Both fresh and frozen, they are a wonderful addition to smoothies. If you have a particular palate, mild-tasing greens like broccoli are an excellent choice. I have a blend of seeds I sometimes grow, and while they are great in salads, they include radish seeds whose flavor I don’t find appealing in a smoothy. Sprouts and greens can be eaten alone, incorporated into salads, stir fry, scrambled with eggs, added to salsa, chopped and added to quesadillas, tacos, sandwiches, and anything else you can think of. Today, my grandson and I chopped some and added it to our enchilada filling; no one even knew they were in there! Growing sprouts or microgreens brings the joy of watching seeds germinate and grow, if only for a few days, and adds a great nutritional power punch to any meal.