
Written by: Margaret Vorndam, Colorado Master Gardener Emeritus
In winter when it’s not possible to grow much outdoors, there’s a way to make time for a different activity, growing native plants from seeds that you collected from wild plants as the seeds matured throughout the year, or by buying native plant seeds from garden business sources. I collected mature seeds this past autumn from wild plants on our acreage with just that thought in mind.
The seeds that I collected were autumn bloomers like Liatris, Coreopsis, and Pink Cinquefoil with potential for ornamental use in my landscape. (I will have to do research online, per below, to identify the specific growing conditions for each species of seed.)
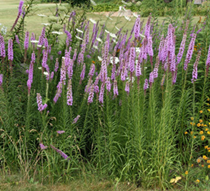 Image above: A good stand of Liatris spp. Grown from seeds
(fr. https://hort.extension.wisc.edu/articles/liatris/)
Considerations for collecting native seeds include first to ensure that you are collecting seeds from plants that are NOT growing in protected public lands without permission. These areas are inclusive of areas such as Federal Lands, state parks, and designated monument areas that are protected by law from collecting plant materials without permission from the governing entities. Ask the landowner for permission to collect on private lands. The best place to collect is on your own property from plants that you’d like to propagate further for personal use.
Second, be sure that your chosen plant has bloomed and is developing mature seeds. These are seeds that are ready to be released by the native plant for distribution for natural propagation in the wilds on its own the next year. Think of a mature dandelion flower head that has produced those fuzzy parachutes waiting to be distributed by a windy day. Plants put out many different forms of seed dispersal depending on the species, so keep an eye out for the flowers of a desired plant. Be ready to collect the seeds when the plant is ready to release them.
Native plant seeds are contained in fruiting bodies. Legume types and others will look like pods such as maturing bean or pea pods. Other fruiting bodies will be in structures with parachutes awaiting wind distribution like dandelions, in fruits such as berries that hold the fruit internally or externally such as raspberries, or within dried protective flowerheads as common to sunflowers. There are many different forms of seed-holding strategies, so take the time to learn about your plant of interest online or from native plant reference books. That’s a good start for information about your seed form.
Collect your seeds into an envelope or container. Once you return home, spread the seeds with the chaff (associated vegetative matter such as leaves, the parachutes, fruit, branch pieces) onto a cookie sheet. Depending on the seed type, use a tweezers or other appropriate tool to separate the individual seed from the chaff. Save the seeds separately into another envelope, be sure to label it with name and date collected and dispose of the chaff.
From here on there are several considerations for storage. Some seeds will grow when sown in a potting soil mix, especially those tweaked for native species, or in your garden without any further treatment. Other seeds require cold stratification in your refrigerator for some period of time to represent a winter interlude before they can sprout.
Yet another type of preparation requires a method referred to as “seed scarification” where the seed coat for each seed requires epidermal nicking with a razor or knife to allow soil nutrients and water to enter the seed, generally through a thick coat, to sprout. Here, you are mimicking how the seed is treated by nature naturally to get the seed embryo stimulated to begin growing. Again, researching online is a great way to identify how each type of seed needs to be treated to grow into a thriving plant. My way of saving seed until I have time to plant them is to place the seed-containing envelope in a plastic bag in my refrigerator at 40 degrees F. for up to four weeks until I have time to process them further. Do not water them while in storage in the fridge. Moldy seed doesn’t do well!
Some seeds can be sown outdoors in the desired location in a garden in the autumn/early winter, perhaps covered by a thin layer of soil, to germinate. If you prefer, you might start these seeds inside in small pots or plant trays. Just mist to keep the soil slightly damp. A grow light can mimic the sun for a growth advantage, but may not be necessary, depending on the plant. Some seeds need only sun and pressing into the surface of the soil to grow while others may need a light covering of soil.
If the seed requires cold stratification, storage in your refrigerator for a few weeks will serve to mimic outdoor winter conditions. Then, follow this with the treatments above of planting indoors or outdoors as described. Ditto in the case of scarifying your seed to get it to begin growing.
Further follow-up information on growing specific wild native seeds can be obtained using Google search on your computer or by contacting your local County Extension Master Gardener group.