
Written by: Jan Dash
A cold frame allows you to extend the growing season by providing a protected environment for
tender vegetables. You can start seeds up to six weeks earlier in pots in a cold frame and transplant them to your regular beds and you can sow late season crops directly in the cold frame for fall harvest.
Place the cold frame in a south-facing sunny location that is protected from wind. Ideally you should place it next to a garage or building to take advantage of radiant heat. I placed mine on the back side of my compost bin. You need a lid for the frame that can be lifted during warm days (over 50 degrees) to keep the plants from overheating. Close the lid in the late afternoon to keep the plants warm overnight. Speaking of lids, almost all designs use a sloping lid to allow the best capture of sunlight. The slope also allows precipitation to run off. Most designs attach hinges to the lid, but I’ve found they are not necessary. You can just lift the lid off the box while you’re working in it and then set the lid back on.
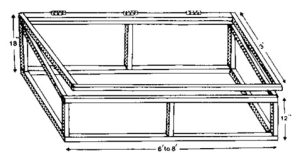
A cold frame can be as elaborate as you want, but a simple design also works well. CSU Extension illustrates a simple cold frame made of 2×2 inch pieces of lumber that are nailed or screwed together and covered with translucent polyethylene plastic. For an 8-foot frame you need 10 pieces of 2in x 2in x 8ft wood. This is a sketch of the design.
I’ve also seen a design that uses straw bales set together to create an opening in the middle that is covered with an old window or a piece of heavy plastic. The straw will fall apart with time and it’s a little hard to reach over the straw into the planting area but it’s easy to construct and the straw can become mulch. Many other DIY designs and instructions can be found on the internet using 2”x6” or 2”x8” inch pieces of lumber to construct the box and lid. You can also buy kits for a cold frame.
I’ve wanted to make a cold frame for a while but never got around to doing it. I tried some makeshift versions; an old window placed on top of a raised bed and clear plastic wrapped over the supports from a netting tunnel on a raised bed. Neither of these worked well. In the first case the window didn’t fit the raised bed, hanging over the edges and getting bumped all the time. The tunnel option was awkward to open for ventilation, and the wind was constantly rearranging the plastic. Both options were ruined in the first hailstorm.
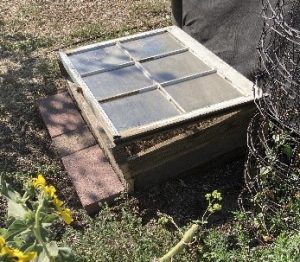
I decided it was time to get busy this year and make something more durable and functional. I have lots of old windows sitting around, stacks of usable, already weathered lumber, and jars of nails and screws. It was time to get to work. I picked out a window that wasn’t too big, didn’t have broken glass and was easily scraped of old paint and caulk. That’s one thing to consider when you use a window – older windows have more easily breakable glass, and the old paint might not be lead free. My window was from the 80’s so I felt okay using it.
Measure the size of the window (38 “by 28” in my case) to determine the dimensions of the cold frame. Select the lumber, measure (twice!) and cut pieces for the sides of the frame. I used 2×4’s and decided to use 3 layers in my design. The bottom layer wouldn’t have a front as it would be buried in the soil at an angle to create the sloping top (see picture). Use a drill to make screw holes in the ends of the lumber and attach the boards together. I used a power screwdriver to really make this job easier. The next 2 layers consist of 4 sides making a rectangle. Finally, place the window on top. Use a couple of scrap pieces of wood to prop the window open during the day and you’re done!
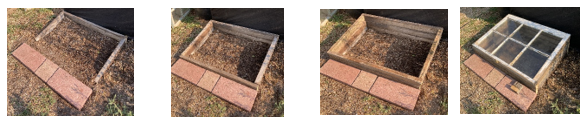
This box is only 10 inches high at the back so I will probably construct another layer of lumber for this bed as the plants grow.
I hope this helps you make your own cold frame. It only took me about 4 hours to construct and I’m so happy with the result that I’m going to make a few more. Happy fall planting to you!
Cold Frame Basics:
- Location: Select a sunny spot in your garden that is sheltered from strong winds.
- Materials Needed: You can use wood, plastic sheeting, cinderblocks, or old windows to construct your cold frame.
- Construction: Make a rectangular frame (e.g., 4 x 8 feet- if using an old window use those measurements) using wood or cinderblocks. Ensure it has a sloped lid to capture sunlight and drain off rain.
- Add a Lid: Use clear plastic sheeting or old windows as a lid to allow sunlight in while retaining heat.
- Ventilation: Make sure to include a way to open the lid for ventilation on warmer days.